
 This blog is about building a classifier on the Azure Machine Learning platform for qualitative activity recognition of weight lifting exercises. This classifier predicts if an exercise has been done correctly (class A).
We will use data from accelerometers on the belt, forearm, arm, and dumbell of 6 participants. They were asked to perform barbell lifts correctly and incorrectly in 5 different ways:
– Class A: exactly according to the specification
– Class B: throwing the elbows to the front
– Class C: lifting the dumbbell only halfway
– Class D: lowering the dumbbell only halfway
– Class E: throwing the hips to the front
The goal of this experiment is to predict the manner in which people did the exercise. This is the “classe” variable in the data set.
The data and more information is available from the website here (see the section on the Weight Lifting Exercise Dataset).
We started to build this classifier as an exercise for the Practical Machine Learning course on Coursera and the results of this prediction can be found here on Github.
However, as Microsoft recently launched the Azure Machine Learning (Azure ML) Studio, we were wondering if we could obtain the same results, building a model on Azure ML.
So we did! We trained 3 models and selected the Multiclass Decision Forest model, with an overall accuracy of 0.9961, which was actually -very slightly- better than our initial results.
The experiment can be downloaded here from the Azure Machine Learning Gallery.
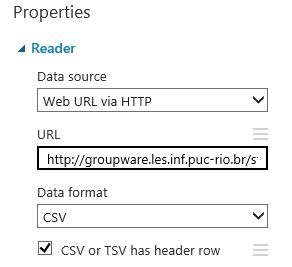
Step 1: Getting the data
We first use the Reader module to obtain the data. The data is available in a .csv format: http://groupware.les.inf.puc-rio.br/static/WLE/WearableComputing_weight_lifting_exercises_biceps_curl_variations.csv
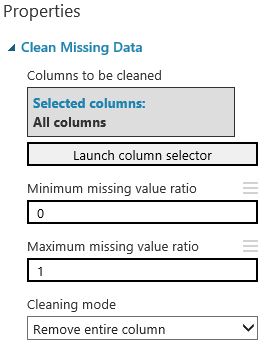
Step 2: Clean missing data
We will only use those columns that have no missing values. All the other columns will removed in the Clean missing module.
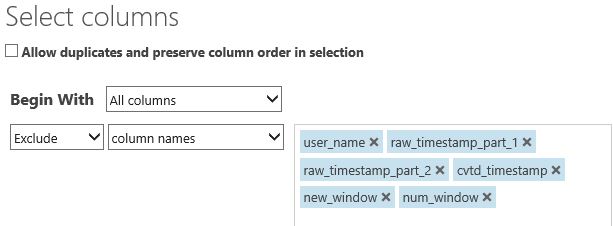
Step 3: Select required columns
We only need information about the sensors from the belt, forearm, arm, and dumbell sensors. The first columns are about the test person and the time frames, which we won’t need, so we exclude them with the Project columns module.
Step 4: Remove highy correlated columns (optional)
In this experiment, we will test several models. For one of them, we will remove the highly correlated columns. We use the findCorrelation() function from the caret package. This package is not installed by default. In order to use this package, please download and zip the package, upload it to Azure, drag it on the canvas, and then you can install it (see code) using the Execute R module.
# Map 1-based optional input ports to variables
wle <- maml.mapInputPort(1) # class: data.frame
# install caret package
install.packages(“src/caret_6.0-41.zip”,lib=”.”,repos=NULL,verbose=TRUE)
library(caret, lib.loc=”.”,verbose=TRUE)
last <- as.numeric(ncol(wle))
prior <- last – 1
# set variables to numerics, except the “classe”
for (i in 1:prior) {
wle[,i] <- as.numeric(wle[,i])
}
# find the highly correlated variables
highly.cor <- findCorrelation(cor(wle[, -c(last)]), cutoff=0.9)
# remove highly correlated variables
wle <- wle[, -highly.cor]
# Select data.frame to be sent to the output Dataset port
maml.mapOutputPort(“wle”);
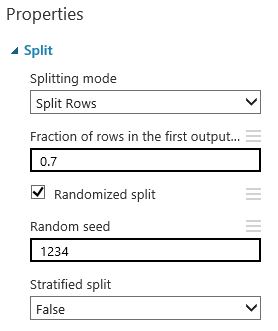
Step 5: Split the dataset into a training and a test set
We split the dataset into 70% for training, and 30% for testing. We set the seed to make this experiment reproducible. In this case, we didn’t use the stratefied split, as it didn’t improve the results. However, be aware that sometimes a normal split is not good enough.
Step 7: Train the models
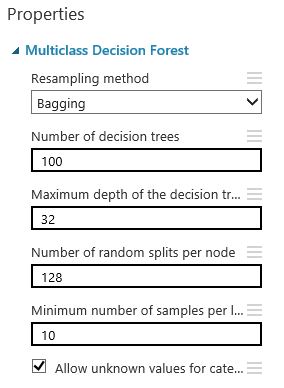
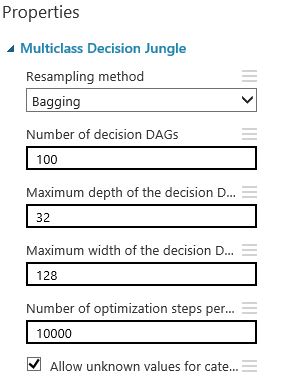
Based on the nature of the data, we decided to test 3 models: Multiclass Decision Forest, Multiclass Decision Jungle, and Multiclass Decision Forest on the dataset where we removed the highly correlated columns. If you don’t know which parameters to use for specific models, you can use the Sweep Parameters module instead of the Train model module. The Sweep Parameters will test several settings and will come back with the best model settings.
Step 8: Score the test data
With the Score model module, the 30% testing data will be scored with the trained model.
Step 9: Evaluate the models
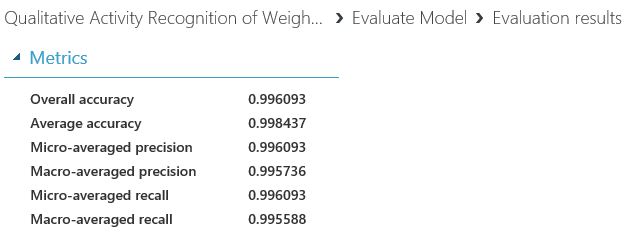
With the Evaluate model module, we are able to evaluate the model. First, we get the overall results.
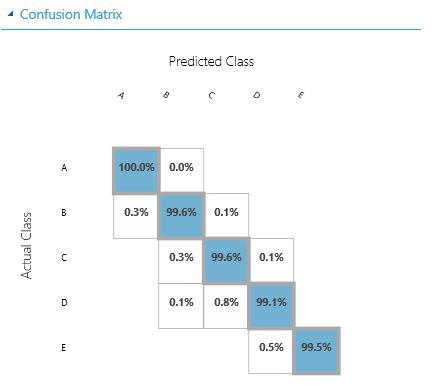
Secondly, we get the confusion matrix, showing the results per class.
Step 10: Conclusion
Comparing the results of the 3 models, we come to the conclusion that Model 1 (Multiclass Decision Forest without removing the highly correlated columns) has the best result. This model can also be published to a webservice, which we will cover in another blog.
| classes | precision model 1 | precision model 2 | precision model 3 |
| A | 0.9982 | 0.9988 | 0.9991 |
| B | 0.9965 | 0.9956 | 0.9956 |
| C | 0.9907 | 0.9830 | 0.9892 |
| D | 0.9933 | 0.9937 | 0.9938 |
| E | 1.0000 | 0.9991 | 0.9995 |
| Average precision | 0.9957 | 0.9940 | 0.9955 |
We also checked the final outcomes, using the test set as provided by Coursera. We therefore saved our best performing model as “Trained Model” and build a new experiment, using the test data as input set.
The final outcome was equal to the -correct- outcome of the Random Forest model, built in R.
Velloso, E.; Bulling, A.; Gellersen, H.; Ugulino, W.; Fuks, H. Qualitative Activity Recognition of Weight Lifting Exercises. Proceedings of 4th International Conference in Cooperation with SIGCHI (Augmented Human ’13) . Stuttgart, Germany: ACM SIGCHI, 2013.
Read more: http://groupware.les.inf.puc-rio.br/har#ixzz3VsIPoMAu